Tuesday, June 18, 2013

Sewing Curtains for the New Kitchen - A Step-by-Step Tutorial

Our new rental home's kitchen is a deep red and taupe and let's just say, red and taupe are not my favorite colors. So, I tried to think of ways to make it more "me" without painting the cabinets.

I decided to make some new curtains for the kitchen window and door.  I've made pillows in the past, but this would be my first time making curtains.  Here's a before picture of the kitchen and the fabric that was used on the kitchen window, kitchen door and the dining room window.
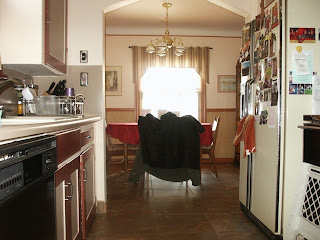
Kitchen cabinets, fabric on dining room window


The door on the left had the same fabric curtains as the kitchen window.  The window also has a top valance that you can't see in the photo.


This photo is really dark, but here's the top valance


First thing's first, I needed a sewing machine.  My mother-in-law didn't have one, so I had planned to try to borrow Kevin's aunt's sewing machine.  Next, I set out to Jo-Ann Fabrics Store to find the right fabric that would match the kitchen, but would also make it look more inviting and fun.  I ended up finding a really great fabric that was the perfect color to match the cabinets and was also "younger" looking.

While I was picking up the thread and fabric, I noticed that the store was having a two-day sale.  I took a look at the sewing machines and saw that they were all half price!  So, I decided to buy my very own Singer Sewing machine for half of the original cost!


Here's the step-by-step tutorial of how I made the curtains on my awesome new machine:

Step One - Measure the windows

Before cutting the fabric, I made sure to measure the windows and record the measurements.

Step Two - Measure the fabric

Next I measured the fabric and made sure I had extra length and width for a half-inch hem around the top and sides, a one inch hem at the bottom, and a two inch opening at the top for the curtain rod.
Measuring the width


Measuring the length


Step Three - Cut the fabric

Now it's time to cut the fabric.  Make sure to cut it at the correct measurement.  You don't want your curtains to be too long or too short.  I also made sure to cut off the edge that had the fringe.  Some people don't cut it off if it won't be seen, but I went ahead and cut it.

Cutting the fringe


 Step Four - Measure your hem and pin your fabric

I measured a half-inch hem around the sides and top of the curtain, and a one inch hem at the bottom of the curtain for a nice little detail.  Then I pinned the fabric a couple of inches apart.

Measuring the bottom


Pinning the bottom of the fabric


Measuring the hem on the sides of the fabric


Step Five - Iron your hem

Not everyone does this step, but I think ironing your hem helps you keep everything flat and straight when you start to sew.
 
Ironing the hem


Step Six - Sew your hem

Before sewing, you'll need to follow your machine's instructions on how to thread your bobbin and your needle.  After doing a quick test-run on a spare piece of fabric to make sure everything is working correctly with your machine, it's finally time to start sewing your curtains.  Go slow and pull out the pins as you guide the fabric through the machine.  Once you've come to the end, cut the thread and move on to the next side.  Then repeat the process. 
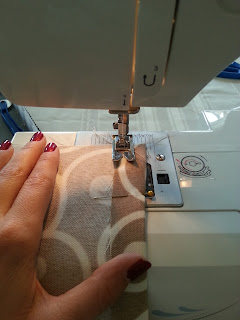
Sewing the bottom hem


Sewing the side

Cutting the thread


Step Seven - Iron your fabric

Next I like to iron the fabric again to make sure everything is smooth and ready for the remaining sides to be measured and pinned.  

Ironing the fabric


Step Eight - Repeat steps 4-7 on the remaining sides

Next, you'll measure and pin the remaining two sides, iron your fabric and sew the remaining hems.  repeat the process the same way until every side of your curtain has a nicely sewn hem.  

Step Nine - Measure and pin the top of your curtains 

I just went with your basic curtains, which have a solid opening at the top for the curtain rod.  Some people sew little loops along the top for the curtain rod, but I figured it would be easier to just sew one opening.  You'll need to make sure you have enough room at the top for whichever curtain rod you plan to use.  The ones for the kitchen window and kitchen door were very small, so I just created a two inch opening.   


Measuring the opening at the top

Pinning the top opening for the curtain rod


 Step Ten - Sew the opening for the curtain rod

Follow the same directions as Step Six.


Here's the finished kitchen door curtain

Here's the finished curtain on the new door!


I followed the same process for the kitchen window valance


Here's the finished kitchen window valance!


Bedroom Paint Makeover - Our First Time Painting a Room!

The first project for our new rental home was to paint the upstairs bedroom.  The previous tenants had painted it a deep, dark red and the owner of our home had painted the trim a cream color, which the tenants kept.  

I'm not a big fan of red, especially in a bedroom, so I knew that the red paint would be the first thing to go.  Thankfully our landlord was kind enough to let us paint the house any color we wanted and provided us with a ton of painting supplies.

Kevin and I had never painted a room before, so we got some great advice from the ladies at Home Depot.  They suggested a grey primer to cover the red before we painted the room with the color we had chosen.  We went with a fun blue color to match our new yellow and tan bedding.  We also bought white paint that we were going to use to paint the window trim and baseboards.


 This is what the bedroom looked like before, with the previous tenant's paint color and furniture.


The back wall is wallpaper, which is crazy hard to take off so we decided to leave it on as well.  Here is how the closet doors looked before.


Step one was to apply the painter's tape to every wall and door frame, then apply the primer on the red part of the door and on the walls.


Here's Kevin painting the grey primer.  He did a great job for never having painted before!


Grey primer on the walls- finished!


Here are the doors with primer over the red trim.


After letting the grey paint dry overnight, I started to paint the walls blue.  I did one coat with the paint roller and then went back over any spots I missed with a smaller roller and a brush.  Next, I used an angled paint brush to paint the edges of the wall up to the blue painter's tape.


This photo shows the grey paint around the edges.


This photo shows where I went back and filled in the edges with the angled brush.


After letting the blue paint dry overnight, I came back the next day and took off all of the painter's tape.  I was going to start painting the cream trim white, until I realized how big of a job it was going to be!  Not only would I need to paint the baseboards, closet and windows, but I'd also have to paint the railing around the stairs, the trim where the wallpaper is, the stairs' hand railing and the sides of the stairs.  It turned out to be too huge of an undertaking, so Kevin found a can of the cream paint in the basement (thankfully) and I just used it to touch up the existing cream paint.


Here's the finished product!

Be on the lookout for pictures of all of the decorated rooms in our new home in an upcoming blog post!

Monday, June 3, 2013

Our Journey to Find the Perfect Pooch - Meet Rick the Samoyed!

Our first photo of Rick

Kevin and I have wanted a dog for as long as we can remember.  We knew we always wanted a large-breed dog, and thought it wouldn't be fair to have such a big dog cooped up in a tiny one-bedroom apartment in DC, so the first thing on our list after finding a house in Michigan was to start our dog/puppy search.

We have been researching dog breeds for over a year.  We knew we wanted a large dog who was great with children and other dogs, who was friendly and outgoing and who was also "less allergenic."  Yes, we know there is no such thing as a "hypoallergenic" dog, but due to Kevin's allergies we needed to find a breed that would be less allergenic for him to be around.

While researching breeds one day we came across the Samoyed.  We were in love with them from day one!  Their puppies look like tiny polar bears and the full-sized dogs look like white, fluffy wolves.  (Click here for some photos!) .  We spent a lot of time watching YouTube videos of these adorable guys and learning all about their behavior and other traits.

The big test would be to meet a Samoyed in person so that we could see if Kevin would be allergic to their dander and/or saliva.  So, after a little research I found out that there was a Potomac Valley Samoyed Club in the greater Washington, D.C. area.  I contacted the president to see if we'd be able to attend an event and meet some of the dogs.  Kevin seemed to be totally fine around them, so we really started to feel that a Samoyed could be the breed for us!

As soon as we got to Michigan I looked into clubs around here, and found the Samoyed Association of Metro Detroit.  I contacted the president for some more information about possible breeders in the area and she sent me about five breeder's contact information in Minnesota, Iowa, Michigan and Canada.  We contacted everyone and found out that there were no available puppies anywhere.  Either they were spoken for, or already had been placed in new homes.  The breeder in Canada said that she had already found homes for her recent litter, but that she had a 16 month old "teenager" named Rick that they'd be willing to place in a new home.

At first we were a little bummed out that there were no available pups, but when we started to think about it we thought that Rick would be the perfect dog-- he's already house trained, kennel trained, and is a retired show dog.  We asked the breeder for some more information about him, and through our phone calls and emails, we began to fall in love with Rick.  We were ready to take the next step and bring him home!

We set a date to meet in London, Ontario to pick up Rick.  Here's some photos from our trip! 

Dog tag, collar and leash.. check!

Passports.. check!

Almost to Canada!


Rick on the car ride to his new home

Rick walking in his grandparent's yard for the first time

Checking out the backyard

Taking a water break

Cuddling with his Dad!

Welcome home Rick!